Monday, November 11, 2013

ON AUCTION NOW, ON EBAY PINK FAIRY


ON AUCTION NOW, ON EBAY... HERE'S THE LISTING IF YOU'RE INTERESTED.
http://cgi.ebay.com/ws/eBayISAPI.dll?ViewItem&item=161148056056

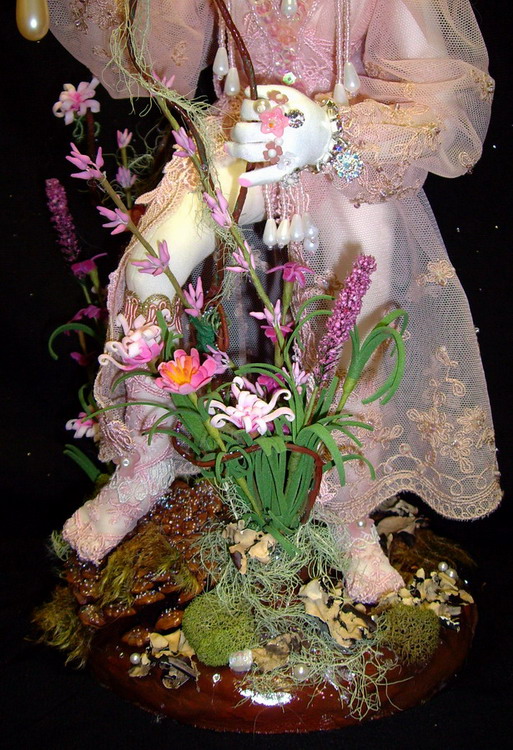
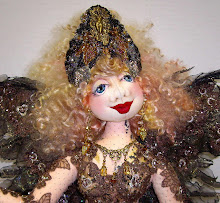
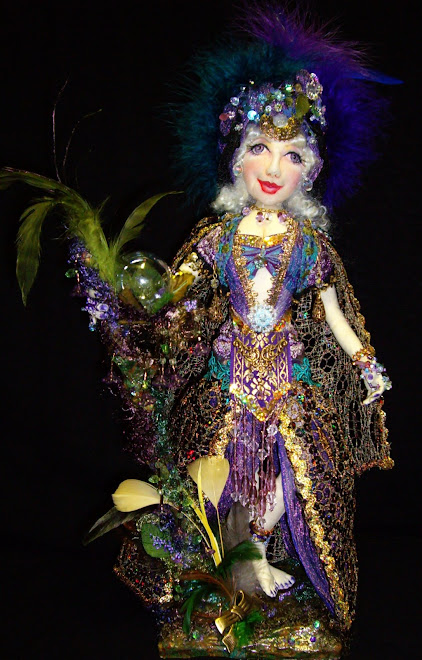
On auction now, on eBay you will find my newest doll... "Victorian Pink Fairy" with display.
She is hand sculpted & painted, all cloth with wire armature. For more detail please follow the link above

Thank you for visiting!
Caroline xo


Saturday, October 26, 2013

Hand Teddy Bear created Oct. 2013


Isn't she precious... I just had to make one. Lately that is all I've been seeing is tiny Teddy Bears, I just love them:)
Her head, arms and legs are moveable. She has black German glass eyes, a crochet hat, boa collar and a piece of vintage jewelry.

Tuesday, October 22, 2013

Pasta Angel Ornaments DIY

This are fast, easy and sooo cute...
This is my last one, I made them by the dozens years ago and sold them all... Great seller for craft shows.

Supplies

Pastas = Rigatoni for body, elbows for arms and bow ties for wings
Wooden ball for head
Wire star garland
Hair
Golden thread for hanging
Mini present or tiny charms... musical instruments look great, including a harp
Gold spray paint
Glue gun 
Permanent ink pens for face or paint

Glue arms to body, then wooden head and last the wings using hot glue gun
Line them up in a pan covered with craft or newspaper.... (spray in well ventilated area).
Spray front, let dry, then spray back, let dry.
 Apply hair using glue gun
Attach golden thread or thin ribbon for hanger just below neck area
Make halo using golden wire and glue just below neck
Draw a simple face... it's easier and very cute with closed eyes and heart shaped mouth.
Lastly add the mini gift or charm
That's it... easy and fun... Enjoy!
Merry Christmas,
Caroline

Monday, October 14, 2013

Crepe Paper Victorian Christmas Tree DIY 10-12-2013

I love these old fashion Christmas Trees and they are so easy to make. 

Here's what I did:

Supplies:

12" cardboard cone or size tree you want
6" round wooden base
acrylic paint (ivory or color of choice) or spray paint
1 roll crepe paper (you won't need the whole thing)
vintage garland
lace
odds and end treasures including old or broken jewelry, charms, crystals, etc.
Glue gun
Sewing machine

Glue cone to wooden base, let dry.
Water down acrylic paint to a milky consistency or use spray paint... paint cone & base.
 Ruffle up the crepe paper using your sewing machine. Let the machine do all the work, set it on #5 setting with about a 3 tension... practice on your machine to see which works best. Leaving thread on ends ruffle crepe paper in usable size pieces (about 2 foot pieces)
Gather everything you want on the tree and heat up your glue gun. 
It comes together pretty fast now... but get ready for lots of glue webs, lol.... I had it every where. It comes right off so don't worry about it.
Start at the bottom with crepe paper just covering the wooden base. Glue in about 2" sections as the glue dries fast and you will have better control.
Continue going around and up the tree either with all crepe paper or you can add lace, vintage garland or eyelash yarn with sparkle.
When tree is covered I used a ruffled trim with silver thread going through it. Starting at the top and gluing here an there where I thought it looked nice. 
Then I cut a Christmas berry spray leaving the wire stems so I could glue the stem and place under a ruffle, pressing gently to hold in place.
Continue adding your treasures until you are happy... wa-la!
It's a perfect center piece or for mantle, fire place or coffee table.

Have fun!
Happy Holidays,
Caroline
 

Wednesday, September 11, 2013

Some of my newest pieces of Jewelry


Here are some of my newest one of a kind, Victorian inspired creations. 
My handmade jewelry pieces are available in both my shops at:

www.candy4me.etsy.com   and
http://store.ebay.com/carolines-handmades

Thanks for stopping by!
Caroline xo

My Apple Head Witch Doll Pattern Published in Soft Dolls & Animals Magazine Nov 2013


H


My newest doll pattern was just published in the November, 2013 issue of Soft Dolls & Animals Magazine. Her face is on the cover in a tiny square:).  She is a REAL Apple Head Witch stump doll. She was so much fun to create and ready for a night on the town. 
I wanted to bring back the very popular Apple Head Dolls from years gone by with an update. She has glass eyes, fake eyelashes, makeup and teeth, not to mention her fancy Witch costume.
The most enjoyable part of this doll is after you carve the apple, is watching it as it shrinks down to about 1/3rd of the original size of the apple which takes about 5 weeks, depending on the climate where you live. Carve several at a time and they will all have a personality of they're own.
I am also offering her in a longer more detailed doll pattern that is available in both my shops at:

https://www.etsy.com/listing/156137480/apple-head-witch-doll-cd-pattern-13-14?ref=shop_home_active 
and 
http://cgi.ebay.com/ws/eBayISAPI.dll?ViewItem&item=161062260843&ssPageName=STRK:MESE:IT

www.candy4me.etsy.com   or  http://store.ebay.com/Carolines-Handmades
it is also available at Dollmakers Journey

Thanks for visiting! Have a great day!
Caroline xo
 

Sunday, July 7, 2013

New, Pink Fairy Doll by Caroline Erbsland 2013


This is my newest doll creation, sorry there is no pattern, just wanted to play:)
She is a Pink Fairy of the enchanted garden. I haven't picked a name for her yet. She is
one of a kind, all cloth, hand sculpted and painted with wire armature. 
I wanted her wings to be lace so I wired and beaded them and added a sequin applique to give the wings more support and of course sprinkled some fairy dust on her wings. I had such fun creating her fairy garden, starting with a wooden base and building up from there. Thanks for stopping by! Caroline xoxo