skip to main |
skip to sidebar
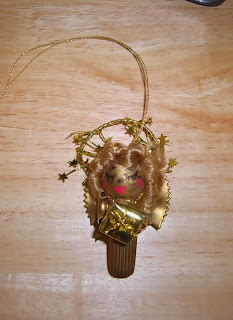
Isn't she precious... I just had to make one. Lately that is all I've been seeing is tiny Teddy Bears, I just love them:)
Her head, arms and legs are moveable. She has black German glass eyes, a crochet hat, boa collar and a piece of vintage jewelry.
This are fast, easy and sooo cute...
This is my last one, I made them by the dozens years ago and sold them all... Great seller for craft shows.
Supplies
Pastas = Rigatoni for body, elbows for arms and bow ties for wings
Wooden ball for head
Wire star garland
Hair
Golden thread for hanging
Mini present or tiny charms... musical instruments look great, including a harp
Gold spray paint
Glue gun
Permanent ink pens for face or paint
Glue arms to body, then wooden head and last the wings using hot glue gun
Line them up in a pan covered with craft or newspaper.... (spray in well ventilated area).
Spray front, let dry, then spray back, let dry.
Apply hair using glue gun
Attach golden thread or thin ribbon for hanger just below neck area
Make halo using golden wire and glue just below neck
Draw a simple face... it's easier and very cute with closed eyes and heart shaped mouth.
Lastly add the mini gift or charm
That's it... easy and fun... Enjoy!
Merry Christmas,
Caroline
I love these old fashion Christmas Trees and they are so easy to make.
Here's what I did:
Supplies:
12" cardboard cone or size tree you want
6" round wooden base
acrylic paint (ivory or color of choice) or spray paint
1 roll crepe paper (you won't need the whole thing)
vintage garland
lace
odds and end treasures including old or broken jewelry, charms, crystals, etc.
Glue gun
Sewing machine
Glue cone to wooden base, let dry.
Water down acrylic paint to a milky consistency or use spray paint... paint cone & base.
Ruffle up the crepe paper using your sewing machine. Let the machine do all the work, set it on #5 setting with about a 3 tension... practice on your machine to see which works best. Leaving thread on ends ruffle crepe paper in usable size pieces (about 2 foot pieces)
Gather everything you want on the tree and heat up your glue gun.
It comes together pretty fast now... but get ready for lots of glue webs, lol.... I had it every where. It comes right off so don't worry about it.
Start at the bottom with crepe paper just covering the wooden base. Glue in about 2" sections as the glue dries fast and you will have better control.
Continue going around and up the tree either with all crepe paper or you can add lace, vintage garland or eyelash yarn with sparkle.
When tree is covered I used a ruffled trim with silver thread going through it. Starting at the top and gluing here an there where I thought it looked nice.
Then I cut a Christmas berry spray leaving the wire stems so I could glue the stem and place under a ruffle, pressing gently to hold in place.
Continue adding your treasures until you are happy... wa-la!
It's a perfect center piece or for mantle, fire place or coffee table.
Have fun!
Happy Holidays,
Caroline


